Got a stenciling project in your future? Today, I’m showing you exactly how to stencil a wall + share my best wall stenciling tips and tricks to help you stencil like a Pro!
A few weeks ago, I revealed our plan to transform our guest bedroom into a hybrid homework station and craft room.
We kicked off the transformation by removing wallpaper, in preparation for painting the room and creating a stenciled focal wall that serves to define the homework zone.
Stenciling can be tricky business. But after conquering the focal wall in this space, as well as a HUGE stenciled wall as part of my primary bedroom makeover, I’ve learned a lot of tricks to make the job easier.
Check out my One Room Challenge™ progress here each week:
Week One | Week Two | Week Three | Week Four | Week Five | Week Six | Week Seven
Now let’s get to the business at hand: how to stencil a wall!

This post contains affiliate links for your shopping convenience (which means if you make a purchase after clicking a link I will earn a small commission) Click here to read my full disclosure policy.
How to Stencil a Wall: My Best Wall Stenciling Tips
Use The Right Tools
You’ve heard the saying…every job is made easier with the right tools. And wall stenciling is no exception to this rule. Here’s a list of tools I use to get the job done:
- ROYAL DESIGN STUDIO STENCILS– I’ve become somewhat of a stencil snob over the years, since working with low-quality flimsy stencils results in a messy end-product and a lot o’ frustration. I’ve had nothing but great experiences with Royal Design Studio stencils. It’s my Go To stenciling source because their stencils are sturdy and easy-to-use. Plus their designs are stunning! For this project, I chose the Contempo Trellis design, since it’s in keeping with the modern vibe I’m trying to achieve in this space.
- STENCIL BRUSHES – There are a variety of brush types that you can use, but I definitely prefer stiff bristled brushes over foam brushes, since I feel like they give me more control over the painting process. If you’re using more than one color in your design, you’ll need a separate brush for each color.
- PAINTER’S TAPE – to secure stencil to wall
- HAIR DRYER – to speed up the paint-drying process
- LEVEL – to keep your design straight as you move across the wall
- ARTIST’S BRUSH – to touch up any mistakes
- PAPER TOWELS – to remove excess paint
Be Strategic About Where You Start and End the Design
Before you slap up your stencil and begin stippling away, determine where the best place would be to start working. In this case, I decided to work from the right side to the left side of the room so that I could avoid having to work too closely around the trim that frames out the closet door.
As you’ll see in the after photos at the bottom of this post, the size of my wall dictated that there would be five complete circle patterns + a 1/2 circle running horizontally across the wall. The most difficult part of the job is stenciling partial patterns, and I didn’t want to make that job even more difficult by having to work around that trim jutting out.
So I made the strategic decision to begin on the right with a full circle pattern and place the partial pattern on the left side of the wall (which did not have any obstacles adjacent to it.
The more walls that you’ll be stenciling, the greater the probability is that your stencil alignment can get out of whack from the start point to the finish point.
So when planning out your start and end points, attempt to end in an inconspicuous place, if at all possible (think behind a door, in a remote corner, or an area that is covered up by furniture, etc.). This way, any misaligned patterns will be much less noticeable.
Speaking of alignment…
Be Vigilant About Stencil Alignment as You Move Through the Project
The hardest part about applying a wall stencil is the set up — that is, making sure that the pattern is in perfect alignment each time you move it and before you begin painting.
As tempting as it is to skip to the fun part, don’t half-a#$ this step or you’ll be super sorry when you step back and realize that your entire design is crooked.
There are two tools you can use to ensure proper alignment.
The first is the stencil registration marks. As you line up the stencil adjacent to the area that you just stenciled, you’ll see that the stencil includes registration marks that guide your stencil placement:
In addition to the registration marks, I also use a basic wall level to make sure I’m maintaining proper alignment as I work along the wall:
Use a Hair Dryer to Speed Up Paint Drying Time
This wall paper stenciling tip was born out of necessity a few years back when I was stenciling all four walls of our small toilet closet in our master bathroom. Completing a whole-room stenciling means that you’ve got to work around four corners with the stencil.
Stenciling around corners can be a royal PAIN, since it’s super difficult to get the stencil in proper position and keep it in that position long enough for the paint to dry (which often results in smeared lines).
Enter your new BFF, the hairdryer.
Blowing hot air onto the freshly painted portion of the stencil dramatically speeds up dry time, which translates into less smearing and paint bleeding under the stencil. It also helps you to complete your wall stenciling project much faster.
This is where your hairdryer comes in really handy:
Protect Your Adjacent Walls and Trim with Painters Tape
This wall stenciling tip probably goes without saying but painter’s tape is your best friend when it comes to minimizing touch up work.
Use it to protect trim and adjacent walls prior to beginning the stenciling project.
In a Wall Stenciling Project LESS Paint is MORE
Finally, when it comes to best practices for how to stencil a wall, remember this golden rule:
Less is More.
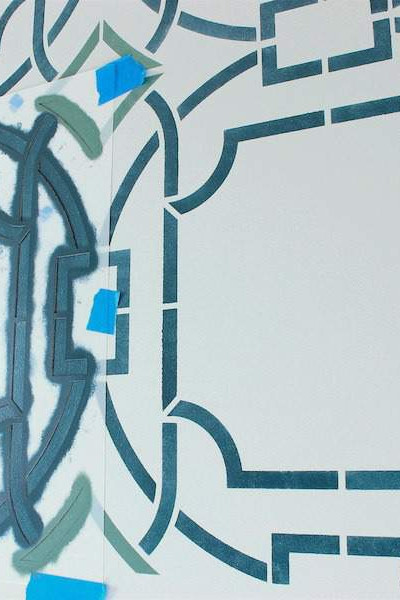
After you dip the tip of your stencil brush in the paint, tap it repeatedly on a layer of paper towels in order to offload excess paint. If you have paint bleeding under the stencil (like you see below on the green portion of the design), you aren’t off-loading enough paint.
Let’s take a look at the finished product, shall we?
Is this stenciled focal wall a thing of beauty or what??! A huge shout out to Royal Design Studio who partnered with me on this project!
Modern Homework/Craft Room Progress: Week 3
It was definitely a productive week, as I was able to tackle MANY of the tasks on the project To Do list, in addition to the painting and stenciling job. Here’s a snapshot of my progress so far:
Sell bedSell light fixtureDonate/Sell CD collectionRemove wallpaperPurchase & install new light fixtureRepair & paint wallsApply wall stencilPurchase homework zone wall shelving & desktopsPurchase desk chairsDecide on craft storage/table configuration and purchase- Install wall shelving/desks for homework zone
- Assemble desk chairs
- Build craft zone furniture
- Source area rug
- Build DIY wall-mounted wrapping paper storage solution
- Purchase accessories & accessorize (clock, storage containers, etc.)
- Relocate craft items to new space
Can’t resist showing off this gorgeous new fixture. I’m LOVING it:
Of course, it wouldn’t be a One Room Challenge™project without some form of drama or set-back. Because I would never want to disappoint, check out what I did during the stenciling process:
Yep. Knocked over a gallon of navy blue paint.
Three quarters of the floor was protected by drop cloths, but OF COURSE it had to spill onto the itty bitty area that was unprotected. The sad thing is that I should know better for all of the painting projects I’ve completed over the years.
I’ve done this before, and I didn’t learn from my mistake. Grrrrrr…
The upstairs carpeting over 12 years old, so it’s approaching the end of its lifecycle anyways. But replacing it right now is definitely not an option. So I get to add one more item to my To Do list:
- Purchase area rug.
Oh, and don’t forget to check out all the rooms that are being transformed this season’s One Room Challenge over at Calling It Home!
Related Posts